


[ad_1]
Eliminating pesky, undesirable advertisements was one of many predominant causes I began rooting my Android telephones years in the past. Nevertheless, as we speak the method of blocking advertisements has been simplified to a fantastic extent, permitting you to make use of third-party browsers, for example, to be sure to don’t see advertisements throughout your looking periods.
Nevertheless, this nonetheless means you will notice advertisements in your telephone when utilizing browsers like Google Chrome and Mozilla Firefox. The excellent news is you could block all browser methods and even advertisements that include apps with a easy function known as Personal DNS.
Personal DNS setting choices will be discovered on most trendy Android telephones, and you need to use these to dam advertisements. Right here’s the way to do it.
Page Contents
How one can block advertisements in your Android telephone
Step 1: Discover the Personal DNS setting
Better of Specific Premium


Discover the Personal DNS possibility in your telephone. This feature will normally be tucked underneath the Community and Connectivity banner or one thing related. Nevertheless, for those who can’t manually discover it, merely go to the Settings search bar and sort “personal DNS” and the choice ought to pop proper up.
When you nonetheless can not discover the Personal DNS possibility in your telephone, your system doesn’t help the function and this trick won’t be just right for you. Personal DNS is normally configurable on Android 9.0 Pie and better.
Step 2: Choose ‘Personal DNS supplier hostname’
The Personal DNS function, when tapped on, will present you three choices – Off, Auto, and Personal DNS supplier hostname. Select the final one and it’s best to see a column to enter your personal DNS hostname supplier.
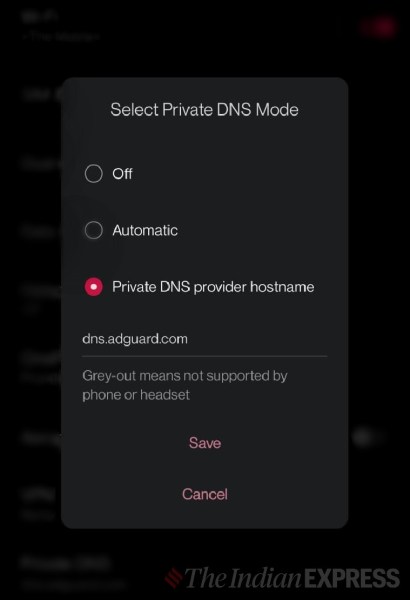

Step 3: Kind ‘dns.adguard.com’ (with out the quotes)
Within the column, merely sort in ‘dns.adguard.com’ with out the quotes and hit save. That’s it. Your telephone will now use AdGuard’s DNS server and block out and advertisements from reaching your system.
It is best to now be utterly ad-free in browsers in addition to some apps. You, nonetheless, should see some clean areas/greyed-out bins rather than advertisements which have been blocked.
Disclaimer:- The trick won’t block app-driven advertisements like Spotify advertisements and YouTube advertisements. Utilizing the Personal DNS function may additionally imply you won’t be able to hook up with some web sites like Chartbeat.
To disable the identical, merely return to the Personal DNS possibility in Settings and select the primary possibility, named ‘Off’ to not use a non-public DNS. This could repair any connectivity points you might have due to the function, however additionally, you will not be capable to simply block advertisements.
[ad_2]
Source link